WordPress optimisations for a faster website
By default, WordPress is not optimized for speed. You can boost your WordPress website to achieve optimal performance through various plugins and modifications. In this article we will discuss how you can do this through caching, compression, PHP versions, loading of plugins, Content Delivery Networks (CDN) and the use of HTTP / 2. We also discuss how you can optimize content such as images and pages for the web and how you can easily measure this. Depending on your website, you can apply a combination of these methods.
Measuring Time To First Byte (TTFB) with UsageDD
The Time To First Byte is a measuring method to look long it takes for the server to load the requested page of your website; the reaction time. This depends on a number of factors, in particular what calculations are done to build the page and the distance to the server. With our hosting you will have a higher TTFB on the other side of the world without CDN (we will come back to this later) than if you are in the Benelux. Improving the TTFB is a handy indicator if you are going to optimize your website, it has little influence on your ranking in search engines.
![]()
In WordPress you can easily measure the response time with the UsageDD plugin. This plugin does not have a configuration in WordPress itself, this is a deliberate choice to prevent the plugin itself having too much impact on the loading times. What it does is to put a small bar on the bottom of each page on the website which shows the reaction time in the middle (left: TTFB and right: CPU time) together with the number of database requests (Q) and the page memory size (M). This bar is only visible on the website if you have been logged in as an administrator. Regular visitors to the website do not get to see them. All you have to do is install and activate the plugin, after which the information will appear on every page.
![]()
HTTP / 2
HTTP / 2 is the new standard for internet connections through http and brings a lot of improvements, including higher performance. We support HTTP/2 standard on all our hosting packages. All you have to do is request an SSL certificate. You receive the standard for free from us on the shared hosting packages. To use the certificate your website must set up a https:// connection, this will also automatically use HTTP2. Your website will work the fastest if you focus https via the .htaccess.
Also read: How can I use HTTP/2 on my hosting package? and How do I automatically use HTTPS?
Caching
By using caching, certain parts of your website are copied and put ready so that they do not have to be loaded from the database each time. For the visitor side of your website you can use WP Super Cache for this. For the management part, the use of Redis is very suitable.
WP Super Cache
The plug-in WP Super Cache makes a copy of all your pages and messages and places them from the database in a cache, so that these pages and messages do not have to be rebuilt every time. This ensures that your WordPress site is loaded a lot faster.
WP Super Cache is a free plugin that you can install from WordPress itself in the plugin management.
Also read: How do I install WP Super Cache?
Redis
Redis is also a caching tool. With Redis, your website is loaded from memory modules instead of the hard disk (with our SSD). In this way, the web server does not have to recalculate each page. At WordPress, the management part of the website will be boosted by the use of Redis.
Redis is a paid service that you can purchase from us from your customer account here on our website. You can find the option in My account -> Redis, you have to be logged in on our website. In WordPress you also need the plug-in Redis Object Cache.
Also read: How do I use Redis with WordPress? Here we discuss all the steps required to connect Redis to your WordPress.
Compression
Applying compression to the content of your website can provide a boost in speed because the data sent to the visitors is smaller, which saves time.
Steps
Step 1. Login to cPanel.
Step 2. Click on Optimize Website, this is under Software.
Step 3. Select Compress All Content and click Update settings.
All your websites within this cPanel account are now using compression.
PHP version
By default, a version of PHP is active as a 'native version'. The exact version is different on every server, you can check the PHP version in cPanel in Select PHP Version. Enable PHP 7.1 or higher if it is not already active. The use of PHP 7.1 and higher leads to an average Performance Boost of 30% compared to PHP 5.6 and below which are End Of Life.
When using a version that does not have "native" in the name you can also make additional settings. This is possible via the PHP options. For new WordPress installations we recommend the following modifications:
max_execution_time = 300max_input_vars = 20000
Also read: How do I change my PHP version?
wp-config.php
In the wp-config.php file you can make a number of other modifications that improve the memory limit and the autosave. To do this, add the code below at the bottom of the file.
define ('WP_MEMORY_LIMIT', '1024M');define ('AUTOSAVE_INTERVAL', 480);
WP Cron
By default, WordPress performs a number of tasks for each page that is loaded, the so-called cron jobs. These tasks keep WordPress clean and up-to-date, but ask many visitors a lot of resources and therefore slow down your website. So you can have it done better by cPanel. Add the following to the wp-config.php so that WordPress does not run it anymore:
define ('DISABLE_WP_CRON', 'true');
Then follow these steps to manually set these cron jobs: How do I manually set up the WordPress cronjob?
Plugins
WordPress loads on every page that your visitors see in the background all plugins that you have installed. The more this is the greater the impact on the speed of your website. It is therefore advisable to check the number of plugins that you have with regularity and to disable or remove plugins that are no longer used.
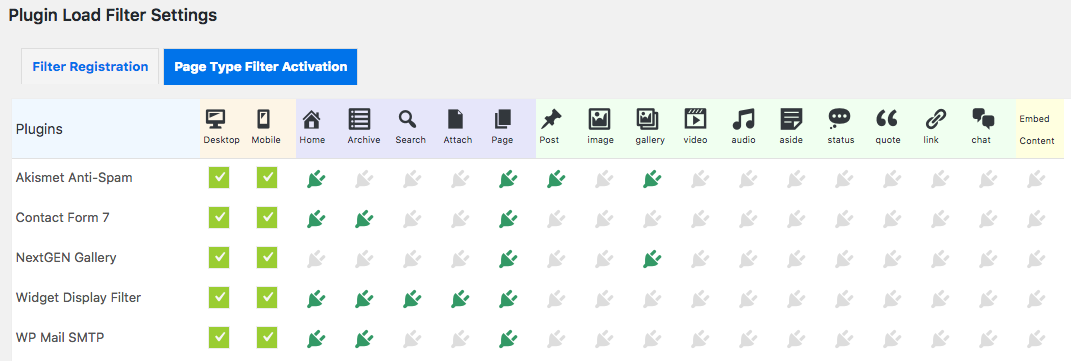
Plugin Load Filter
If you still have a lot of plugins active after selecting unused plugins, then it is advisable to use the Plugin Load Filter. With this plugin you decide which plugins do not need to be loaded on the pages that your visitors see. For example, you can exclude plugins that only make changes to the WordPress management panel.
Steps
Step 1. Login to WordPress.
Step 2. Click on Plugins in the left menu and then on the top of the page on New plugin.
Step 3. In the top right corner of the searchbar, enter Plugin Load Filter and press enter.
Step 4. Click on Install now at Plugin Load Filter. After the installation is complete, click Activate.
Step 5. Click on Plugins in the left menu and then click on Plugin Load Filter.
Step 6. At Filter Registration you indicate which plugins to load when. Plugins that only relate to your WordPress management are placed under Admin Filter. If you want to indicate per page type whether a page should be loaded, then you choose Page Filter.
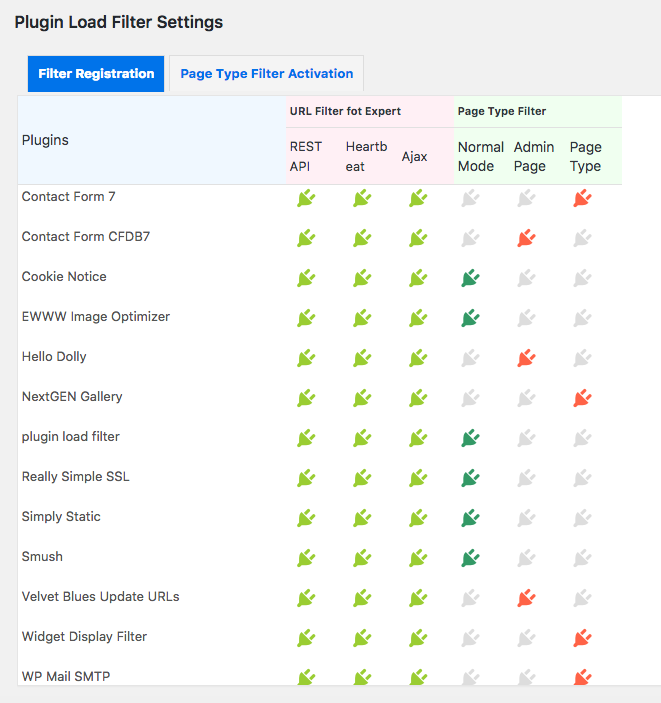
Step 7. At Page Filter Activation you choose which type of pages to load the plugins set with the Page Filter.
Step 8. You can indicate which plugins are loaded on specific pages. You do this from the page editing and then in the bottom right of Page Filter Plugin.
Content Delivery Network
A Content Delivery Network (CDN) helps your website load faster for visitors around the world. Because our servers are located in the Netherlands, you can use a CDN to ensure fast loading times worldwide. For the shared webhosting we work together with Cloudflare to offer you a lightning fast CDN. You activate Cloudflare for free for all your websites from your cPanel. On Cloud you can use Cloudflare via a manual configuration via their service.
WP-Smushit
Images and photos are now a large part of websites. With ever faster internet we share more and more of this type of content. Large images, however, lead to slowing down your website and especially the loading times. The more data your website needs to send to the visitor, the longer it takes to load those pages. You can of course adjust all these images locally on your computer in terms of resolution, compression and the like, but there are also several useful plugins that can do this for you from WordPress itself. WP-Smushit is such a plugin, knowledge about optimizing images is not really a requirement here but can help.
Steps
Step 1. Log in to WordPress.
Step 2. Click on Plugins in the left menu and then on the top of the page on New plugin.
Step 3. Enter WP-Smushit in the upper-right corner of the searchbar and press enter.
Step 4. At WP-Smushit click on Install now. After the installation is complete, click Activate.
Step 5. Click on Smush in the left menu.
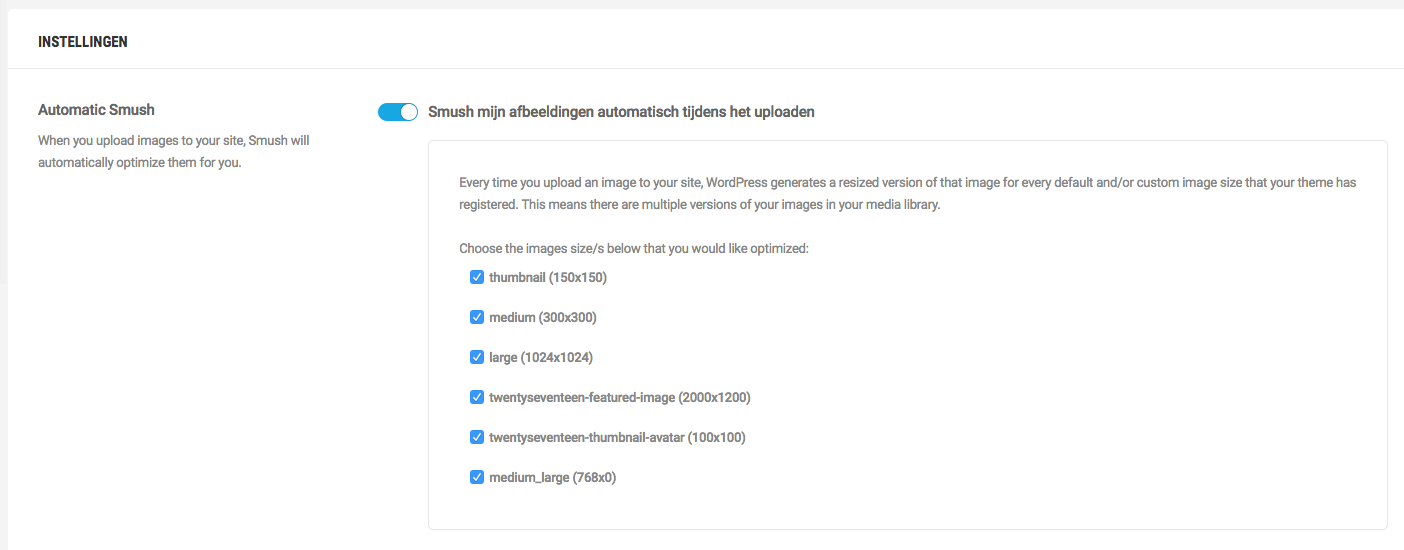
Step 6. Scroll down to the settings, with Automatic Smush you can set up to automatically improve images for the web when uploading. New uploads will be automatically 'smushed' from now on, so you do not have to do anything else for this.
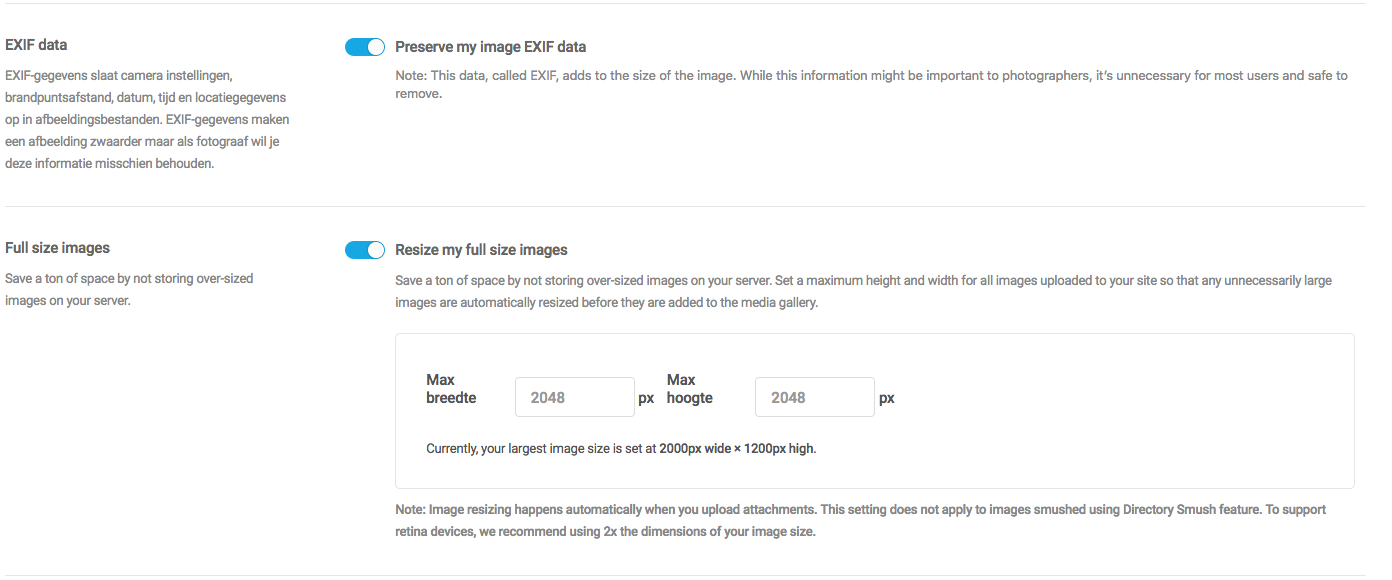
Step 7. With EXIF data you can indicate whether you want to keep the data that your camera places in photos in the improved images. Retention of this may be relevant to photographers, but for most visitors to the website this will not be the case. Deleting this data makes the images slightly smaller, which improves the loading time.
Step 8. At Full size images you indicate whether the images on the server can be saved and the maximum size. With this you can save considerably on your storage of your package. Make sure you always keep a copy of the original locally if you need it later.
Step 9. Check the header at the top of Bulk Smush if there are still images on your website that need to be 'smushed'. By doing this you improve existing images on the website.
Simply Static
If your WordPress website consists of pages with static content, you can gain a lot of speed gain by making your entire website static. Unfortunately this does not work if you have a dynamic website. The difference: If your website shows every visitor the same content as only text and photos, we call it static, think of a blog. For example, a dynamic website has pages that show different content for each visitor, for example a webshop. You can make your WordPress site static with the Simply Static plugin, this not only makes your website faster but also a bit safer because the visitor can see pure html.
Important: The idea of Simply Static is that your actual WordPress website is not on the domain name itself but on a subdomain or even offline. Simply Static generates a downloadable zip archive from your entire website which you can extract from your website's folder on your package. These are then purely HTML files and the like.
Steps
Step 1. Create a subdomain in cPanel where you want to move the WordPress website.
Step 2. Move your website to this subdomain and make sure that the paths that WordPress uses are correct with the new location, think of the home and siteurl in your wp_options table of your database. If you are new to this, it is best to make a clone from your website with Softaculous to the subdomain. Softaculous will do all of these for you.
Also read: How do I create a test environment with Softaculous?
Step 3. If you have the old WordPress installation on the domain itself, delete it or move the files to another location.
Step 4. Log in to WordPress.
Step 5. Click on Plugins in the left menu and then on New plugin at the top of the page.
Step 6. Enter Simply Static at the top right of the searchbar and press enter.
Step 7. At Simply Static click on Install now. After the installation is complete, click Activate.
Step 8. Click on Simply Static in the left menu.
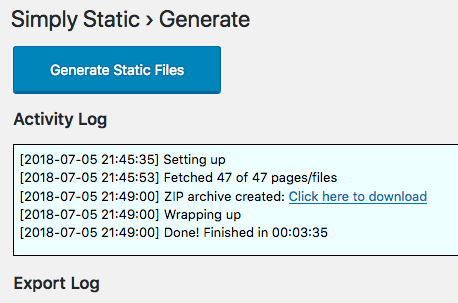
Step 9. Click on Generate Static Files to start converting your WordPress site to HTML. Keep an eye on the Activity Log as soon as the conversion is finished, this will be shown here. This process can take several minutes depending on the size of your website.
Step 10. As soon as Simply Static is finished, it shows the text: ZIP archive created: Click here to download. Click on that link to download the zip archive with the static version of your website to your computer.
Step 11. Upload the zip archive to the folder where your website is being loaded from, this was the location where your WordPress installation first stood. You can upload this, among other things, via the cPanel file manager or an FTP client.
Step 12. Unzip the zip archive so that its contents are placed in the folder of your domain.
Congratulations! Now your website is completely static and will load super fast!
Note: If you want to make updates to your website, you do this via the subdomain where your WordPress installation is now on. After each change you generate the entire website again with Simply Static and then put it live again, following all the steps from step 8.
Scheduled additions
This knowledge base article is constantly updated with new additions due to new developments but also from customer feedback (thanks for the feedback!). The following items will also be documented here in the near future, we recommend you to definitely check this out if you want to try more optimizations.
- WordPress MultiLanguage (WPML) optimizations
- WooCommerce optimizations
- Swift Performance Lite, a plugin that can be used instead of the W3 Total caching plugin (if you use it)
- Autoptimize, a plugin that bundles the power of multiple optimizations for you
- Asset CleanUp: Page Speed Booster, CSS / JavaScript optimizations
- WP-DBManager, database optimizations


